Dependency Injection (DI) is a design pattern to change definition by substituting object without changing code for the application. The most popular DI type is to construct classes based on certain interface and pass actual object on constructor level.
What are we trying to do?
 We will be looking into a way to achieve dependency injection through XML configuration based on build selection. The implemented classes derived through interface will get switched based on build selection.
Where to use it?
I really hate making dependencies with something specific which can be changed later on. In my case, Azure environment. I believe Azure is more like a platform where we can host the application rather then integrating the application with Azure. What if client decided to switch to other hosting environment, in that case we got to change every piece of code wherever Azure SDKs are referred.
The above one is merely an example. We can use this approach on many other item as well.
What tools are used?
Ninject(http://www.nuget.org/packages/Ninject): This is going to used for dependency injection.
Ninjeect.Extensions.Xml (http://www.nuget.org/packages/Ninject.Extensions.Xml): This will be used to construct Ninject kernel through XML file.
SlowCheetah (http://visualstudiogallery.msdn.microsoft.com/69023d00-a4f9-4a34-a6cd-7e854ba318b5): An extension of Visual Studio to transform config or XML files.
Processes to do DI through SlowCheetah
I am expecting that you have installed the above tools at this point.
Step 1 - Creating main XML:
Let's start by creating NinjectInjection.xml file with required injections.
You can see, I have configured injections for Caching and File uploading mechanism which will support local file system and Memory Caching on IIS. Based on selection of build we will switch definition to Azure Caching and Azure BLOB storage or normal IIS approach.
Step 2 - Creating dependent XML files:
Right click on created XML file and select Add Transform which will generate up XML files based on build profiles.

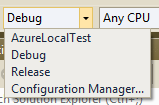
Generated XML files. In this case, I am having NinjectInjection.AzureLocalTest.xml as extra item as per my build configuration profile.

Step 3 - Transforming XML files based on our need:
The idea is to find particular element (bind element) in desired XML file and change the value of it. XSLT or Microsoft XML Document Transform (http://msdn.microsoft.com/en-us/library/dd465326(VS.100).aspx) can be used.
Let's change the values on NinjectInjection.Release.xml file.
xdt:Locator="Match(service)" is to find element with specified attribute value and xdt:Transform="SetAttributes" to set new value.
We can check transformation text by right clicking NinjectInjection.Release.xml file and selecting Preview Transform which will result as:

Step 3 - Setting up Ninject kernel to load injections through XML file:
Let's first configure XML file to move into project's bin directory on successful build of application. Right click NinjectInjection.xml file and select Properties to set Copy to Output Directory as Copy to always or Copy to newer.

This will always get transformed XML file based on build configuration profile.
Now, just registration need to be done on Ninject kernel. Ideally, NinjectWebCommon file gets created under App_Start folder. On RegisterServices function put these to configure kernel.
What are we trying to do?
We will be looking into a way to achieve dependency injection through XML configuration based on build selection. The implemented classes derived through interface will get switched based on build selection.Where to use it?
I really hate making dependencies with something specific which can be changed later on. In my case, Azure environment. I believe Azure is more like a platform where we can host the application rather then integrating the application with Azure. What if client decided to switch to other hosting environment, in that case we got to change every piece of code wherever Azure SDKs are referred.
The above one is merely an example. We can use this approach on many other item as well.
What tools are used?
Ninject(http://www.nuget.org/packages/Ninject): This is going to used for dependency injection.
Ninjeect.Extensions.Xml (http://www.nuget.org/packages/Ninject.Extensions.Xml): This will be used to construct Ninject kernel through XML file.
SlowCheetah (http://visualstudiogallery.msdn.microsoft.com/69023d00-a4f9-4a34-a6cd-7e854ba318b5): An extension of Visual Studio to transform config or XML files.
Processes to do DI through SlowCheetah
I am expecting that you have installed the above tools at this point.
Step 1 - Creating main XML:
Let's start by creating NinjectInjection.xml file with required injections.
 <?xml version="1.0" encoding="utf-8" ?>
 <module name="MyProjectInjection">
  <bind
   service="MyProject.Interface.Cache.ICacheWrapper, MyProject.Interface"
   to="MyProject.Core.Caching.AppMemoryCache, MyProject.Core" />
  <bind
   service="MyProject.Interface.Cache.IAppCache, MyProject.Interface"
   to="MyProject.Core.Caching.AppCache, MyProject.Core" />
  <bind
   service="MyProject.Interface.Uploader.IFileUpload, MyProject.Interface"
   to="MyProject.Core.Uploader.Local.LocalFileUpload, MyProject.Core" />
 </module>
You can see, I have configured injections for Caching and File uploading mechanism which will support local file system and Memory Caching on IIS. Based on selection of build we will switch definition to Azure Caching and Azure BLOB storage or normal IIS approach.
Step 2 - Creating dependent XML files:
Right click on created XML file and select Add Transform which will generate up XML files based on build profiles.
Generated XML files. In this case, I am having NinjectInjection.AzureLocalTest.xml as extra item as per my build configuration profile.
Step 3 - Transforming XML files based on our need:
The idea is to find particular element (bind element) in desired XML file and change the value of it. XSLT or Microsoft XML Document Transform (http://msdn.microsoft.com/en-us/library/dd465326(VS.100).aspx) can be used.
Let's change the values on NinjectInjection.Release.xml file.
 <?xml version="1.0" encoding="utf-8" ?>
 <!-- For more information on using transformations
    see the web.config examples at http://go.microsoft.com/fwlink/?LinkId=214134. -->
 <module xmlns:xdt="http://schemas.microsoft.com/XML-Document-Transform">
  <bind
   service="MyProject.Interface.Cache.ICacheWrapper, MyProject.Interface"
   to="MyProject.Core.Caching.AzureCacheWrapper, MyProject.Core"
   xdt:Transform="SetAttributes" xdt:Locator="Match(service)"/>
  <bind
   service="MyProject.Interface.Cache.IAppCache, MyProject.Interface"
   to="MyProject.Core.Caching.AzureAppCache, MyProject.Core"
   xdt:Transform="SetAttributes" xdt:Locator="Match(service)"/>
  <bind
   service="MyProject.Interface.Uploader.IFileUpload, MyProject.Interface"
   to="MyProject.Core.Uploader.Azure.AzureFileUpload, MyProject.Core"
   xdt:Transform="SetAttributes" xdt:Locator="Match(service)"/>
 </module>
xdt:Locator="Match(service)" is to find element with specified attribute value and xdt:Transform="SetAttributes" to set new value.
We can check transformation text by right clicking NinjectInjection.Release.xml file and selecting Preview Transform which will result as:
Step 3 - Setting up Ninject kernel to load injections through XML file:
Let's first configure XML file to move into project's bin directory on successful build of application. Right click NinjectInjection.xml file and select Properties to set Copy to Output Directory as Copy to always or Copy to newer.
This will always get transformed XML file based on build configuration profile.
Now, just registration need to be done on Ninject kernel. Ideally, NinjectWebCommon file gets created under App_Start folder. On RegisterServices function put these to configure kernel.
       kernel.Load(Assembly.GetExecutingAssembly());
       var ninjectConfig = Path.Combine(AppDomain.CurrentDomain.SetupInformation.ApplicationBase, "bin//NinjectInjection.xml");
       if (File.Exists(ninjectConfig))
       {
         kernel.Load(ninjectConfig);
       }
The above code will look into bin directory by name of NinjectInjection.xml and configure kernel. Based on build configuration profile selection, contents of this file will keep changing.
Comments
Post a Comment